Geir, my Norwegian troll
The original idea was to create something true to the old tales but not very scary with princesses hanging out from its mouth...
Fortunately, I found this kind of illustrations and started brainstorming about the future outlook of the stuffed toy.
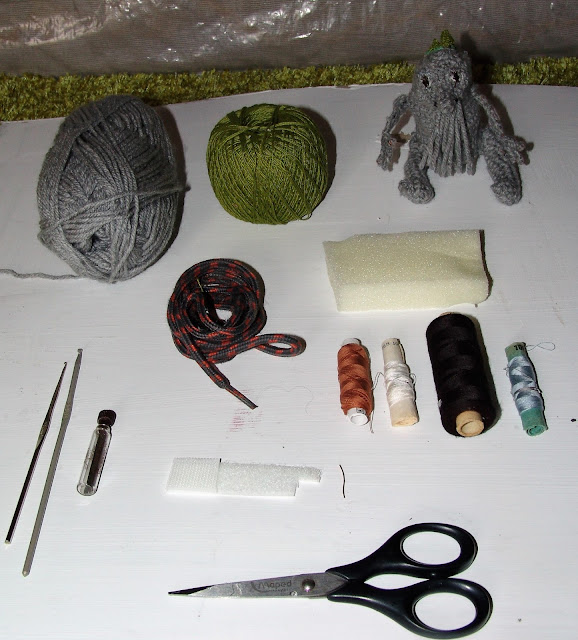
Of course, I bought one more piece of grey yarn... And yeah, when I was taking photos for the blog I found two more of them. Anyway, I made a picture of the materials of this a-little-bit-complicated-but-succesful craft.
So, I used
- thicker gray yarn (with 3mm crocheting hook)
- thinner green yarn (with 1.4 mm crocheting hook)
- Shoelaces
- simple sewing needles
- wire
- velcro
- threads (black, gray, white and brown)
I am not really good with following patters so it would be kind of hypocrisy to tell anyone what or how to do. I will tell you how I did this little troll and after seeing the finished product you will be able to tell if you want to take any of my advices or ideas :D
1., First of all I started to crochet a simple fatish sack from gray yarn as the body of my troll. It was planned to be 8 centimeters high so I stopped after crocheting 3 cm (about three lines) to attach the arms.
2., Beforehand, I made the hands (ha-ha-ha). I curved them from wire as well as four fingers for each hands. The two pieces of wire were longer than I planned its arms to be to have a part of them inside the body of my troll (because it makes it stronger)
3., I crocheted the wire pieces around and knotted cramps to the end of the four fingers to make it more stable.
 4., So... Back to the troll. After three centimeters I attached them to the fatish sack and crocheted over them as it was body's part.
5., I finished the sack at the same way on each ends so I got a geoid shape. Before closing the shape, I stuffed it with left-over pieces of fabric and sponge.
6., For its legs, I curved old shoelaces two or three times until it got thick enough and sewed them together a little bit. At the future ankles I fixed the angle with more sewing. Afterwards, I crocheted it around like I did with arms and hands.
7., I impacted the legs to the body by crocheting but maybe I should have simply sewed it.
 8., The face is really emphasized in case of an old, sad troll so I evolved its nose at first, Crocheted a circle to the surface of its face and built barrel-shape to it.
9., Its eyes are from three differently colored threads; black, white and -in my case- brown. I started with the white then went on with less brown and finished with a little black stitch.
I used the last -grey- thread to empasize the eyebrows of Geir.
***
Basically, this was the body, aka the first part of the project.
Here comes the trick which makes this slightly ugly creature loveable.
Pinetrees!
By a 1,4 mm headed crocheting needle and some thinner yarn I made about 10-11 little pine trees - green cones...
I cut a 4-5 cm long piece of velcro and colored the tougher half of it grey and the softer one green by oil paint. It takes time for oil paint to dry so I hanged them on my lamp and let it dry for 2 days. ----> #modernart
When they got dry I started to sew the gray half to the back of Geir. It was so hard... So I highly recommend you to use those triangle headed leather sewing needles. Personally, I don't know where is mine so it took hours to fix the velcro.
The last step is to sew the cones to the soft side of the velcro and attach them together. So that it is removeable and when it doesn't have the trees on its back then it is just stinging and grumpy like a real troll :D
And ladies and gentlemen... here is Geir!
See you soon! :*


Looks fantastic! I love the detailed yet simple instruction layout. He turned out rather cute for a troll :)
ReplyDeleteThis comment has been removed by the author.
ReplyDeleteThe ingenuity is shown in the simplicity on this one, so easy to do (with the guide) yet so beautiful. I wish I had come up with this, great work!
ReplyDeleteWow this is cool! This guide is very detailed, the troll looks cute :D
ReplyDeleteThank you guys! You are all so sweet and supporting 😁
ReplyDelete